C4Dマイクロチップ電気泳動の原理および使用方法
非接触電導度検出器(C4D)を用いたマイクロチップ電気泳動法(MCE)の手順
はじめに
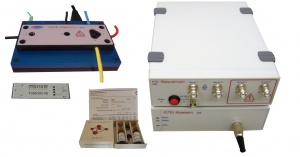
このアプリケーションノートでは、静電結合型非接触電気 電導度検出器(C4D)を使ったマイクロチップ電気泳動法(MCE-C4D)の操作手順をステップ-バイ-ステップで説明します。 eDAQ マイクロチップ電気泳動キットには、C4D データシステム、C4D マイクロチッププラットフォーム、高電圧シーケンサー、C4D の電極を埋め込んだマイクロチップ、カチオン及びアニオンを含む標準液キットが含まれています。
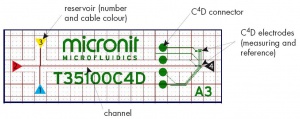
図 1 は使用するマイクロチップの構造を示した写真です。
Equipment Required
- ER255 or ER455 Microchip Electrophoresis bundles, including:
- ER225 C4D Data System
- ET225 Micronit Platform
- ER230 High Voltage Sequencer (one or two units)
- ET145-4 CE Microchip (45 mm) kit
- PowerChrom and Sequencer softwares
- EC20 Standard Test Solutions:
- BGE = 0.5M acetic acid
- Sample = 1mM LiCl, KNO3 and Na2SO4 in deionised water
- One 20 - 200 µL pipette, with pipette tips
- One syringe 5 mL
- Deionised water
- Lint-free tissues
Floating Injection
This section describes a procedure for a microchip electrophoresis experiment using a floating injection. This type of injection requires control of the voltages at only two of the fours reservoirs of the chip. Thus only one High Voltage Sequencer is needed. During the floating injection step, 1000 V is applied across the chip (between reservoirs 1 and 3). The channels of the chip are in a double-T configuration, and this voltage fills the small area between the offset of the channels. During the separation step, 1000 V is applied along the chip (between reservoirs 2 and 4). This moves the sample towards the detector and reservoir 4, separating the ions as they travel.
A gated injection, which requires control of the voltage at all four reservoirs of the chip (and thus needs two High Voltage Sequencers), is described later in this application note.
Preparing the Hardware
The Microfluidic Chip Electrophoresis Kit contains many components and cables. Please follow the instructions below in the order listed.
- Check you have all the components listed in the packing lists.
- Install the Sequencer software and PowerChrom software on the computer. Ensure you have installed the latest versions of softwares from www.edaq.com/software_dnloads.html
- Connect the High Voltage Sequencer (HVS) to the computer with a USB cable, as described in the instruction manual. Do not turn it on yet.
- Connect the C4D Data System to the computer with a USB cable, as described in the instruction manual. . Do not turn it on yet.
- Connect the Chip Platform to the C4D Data System using the HDMI cable.
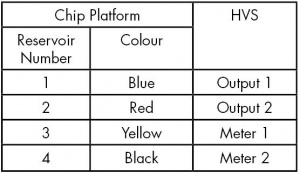
- Connect the Chip Platform to the HVS using the coloured high voltage cables as shown in Table 1.
- Make sure you connect the correct black HVS cable to the HVS, as there are two of them. If you are using 45 mm chips, you should use the black cable in the middle of the platform.
- Connect the interlock cable between the Chip Platform and the HVS. Warning: the interlock is designed to disarm the HVS if the cover plate is lifted from the Chip Platform. Do not try to bypass the interlock.
- The microchip holder must be grounded to reduce noise in the C4D data signal. Use a green ground cable to connect the ground connector on the Chip Platform to the green connector at the back of the C4D Data System. Use a second cable to connect the green connector at the back of the C4D Data System, to the green connector at the back of the HVS.
- The HVS can trigger the PowerChrom software to start recording. Use the red and black trigger cable to connect the “CTL1 +” at the back of the HVS to the “TRIG +” at the back of the C4D Data System. Connect the HVS “CTL1 –” to the C4D “TRIG –”. See Video 2.
- Turn on the HVS. The driver will be installed if this is the first use.
- Open the Sequencer software and ensure you are able to connect to the HVS by clicking on the Online button at the top of the screen. You may need to go into the File, Preferences menu to select the correct Connection Serial Port for the HVS. You can use the Serial Port Monitor software (from the eDAQ website) to see which COM port the HVS is connected to. Move and resize the Sequencer software screen so it occupies the left half of the screen.
- Turn on the C4D Data System. The driver will be installed if this is the first use.
- Open the PowerChrom software. Ensure the software has setup the hardware unit; you should see the Easy Access window, not the Hardware Unavailable window. Move and resize the PowerChrom software screen so it occupies the right half of the screen.
- Setup the trigger commands in the software packages as shown below:
- Sequencer software: in the menu File, Preferences, select Contact Closure.
- PowerChrom software: in the menu Edit, Preferences, Digital IO Settings, select External Trigger Mode as Voltage Level (TTL).
- PowerChrom software: in the Manual Sampling window, Inject Settings, select Wait for Inject.
- Sequencer software: in the later step, when you are setting up the sequence, remember to select High/Closed, under Digital Output 1, during the separation step, as this will send the trigger command. Also remember to select Low/Open in the very last step (after the separation is complete).
- Use gloves to place the empty microchip in the Chip Platform. Ensure that the four circular C4D connectors lie on top of the four pins on the platform. Figure 2 shows a microchip in the platform.
- Place the reservoir cover on.
- Ensure that the O-rings underneath the cover are in place and are dry; wipe with a tissue if necessary.
- Don’t turn the screws too tight; the screws should be turned finger-tight.
- Ensure that the reservoir cover is sitting flat and level with the base of the platform.
- Place the cover plate on top of the platform. You may need to move the high voltage cables slightly to ensure it is sitting flat and level with the base of the platform
Sequencer Software
- Ensure the Sequencer software is open and in Online mode.
- Setup a sequence as shown in either Table 2 for separating cations, or Table 3 for separating anions. These use a Floating Injection.
PowerChrom Software and Pipetting Solutions
- Ensure the PowerChrom software is open.
- In the Easy Access window, click Manual Run.
- In the Manual Sampling window, click Inject Settings and select Wait for Inject (Start recording immediately) and OK.
- In the Manual Sampling window, enter Stop sampling 2.00 min after Inject.
- Click Hardware Settings. Enter the following settings and then OK:
- Sampling speed = 100/s
- Channel 1: Input = Input 1, Range = 50 mV
- Channel 2: Input = Off
- Click C4D Amplifier and enter the following settings:
- Low Pass = 5 Hz
- In Offset, click Zero
- Dilute the sample from 1 mM to 100 µM with deionised water.
- Pipette 50 µL of the BGE into Reservoir 4. It should take less than one second for capillary action to fill the channel with the solution. This can be confirmed by observing a change in conductivity in the C4D signal.
- Keep the pipette vertical while pipetting solutions into the reservoirs.
- Make sure that the pipette tip gently touches the sloping walls of the reservoir, as you deliver the solution. This will prevent the formation of an air bubble at the bottom of the reservoir.
- Use different pipette tips when transferring the BGE and the sample to the reservoirs, and when removing solutions from the reservoirs. This will avoid contaminating the solutions.
- In the PowerChrom software:
- If you already know the C4D settings for Frequency, Amplitude and Headstage Gain, then enter these values now in the C4D Amplifier window, or
- If you don’t know the C4D settings, use the C4D Profiler to optimise the C4D settings, as described in a separate application note. This must be done with BGE in the channel.
- If separating cations, pipette 50 µL of the BGE into Reservoir 2 and Reservoir 3. Pipette 50 µL of the sample into Reservoir 1.
- If separating anions, pipette 50 µL of the BGE into Reservoir 2. Pipette 50 µL of the sample into Reservoir 1 and Reservoir 3.
- Visually check that you have the same volume of solution in each of the reservoirs.
- Place the cover plate onto the holder.
- Click Zero in the Offset box.
- You may need to select a smaller value for the Range at this point. Click OK twice to return to the Manual Sampling window.
- Arm the HVS by pressing and holding the red button on the front of the HVS unit.
- You are now ready to analyse your sample. In the PowerChrom software, click “Start”.
- In the Sequencer software, click “Run” to start the HVS sequence. This should trigger the PowerChrom software to start recording.
Results for Cations
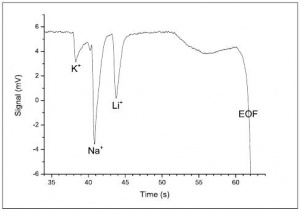
The electropherogram for the cations, run at 100 µM concentration, is shown in Figure 4. As predicted by Peakmaster software, three negative peaks are observed. The peaks are negative because the three cations Li+, Na+ and K+ are less conductive than the H+ cation they are displacing in the background electrolyte. The electropherogram can be recorded with positive peaks by selecting Invert in the C4D Amplifier window, in the Hardware Settings of the PowerChrom software.
Figure 4 shows the data with a sample injection time of 20 seconds. Increasing the injection time, to 30 and 40 seconds, resulted in larger peaks but the separation of the peaks was not as good.
Results for Anions
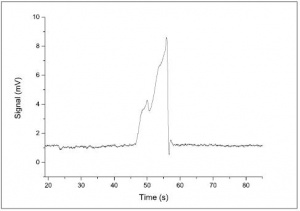
Figure 5 shows the electropherogram for anion analysed at 1mM. This concentration will overload the system, resulting in one large peak which cannot be resolved.
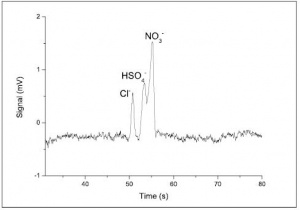
The solution for running anions should be diluted to 100 µM with deionised water. The electropherogram is shown in Figure 6. Peakmaster software predicts the two positive peaks obtained, where the HSO4- and NO3- peaks cannot be resolved. Separating the anions under these conditions will not produce an EOF peak, because the EOF travels away from the detector, towards Reservoir 2.
Procedure for Changing the Sample
- Disarm the HVS.
- Remove the cover plate from the platform.
- Remove the sample from the sample reservoir using a pipette.
- Flush the sample reservoir a few times using deionised water.
- Pipette 50 µL of the new sample into the sample reservoir.
- Replace the cover plate.
- Arm the HVS.
- Begin the analysis of the new sample.
Procedure for Removing the Microchip
- Disarm the HVS.
- Remove the cover plate from the platform.
- Remove the solution from each of the reservoirs using a pipette.
- To prevent formation of salt crystals inside the channel during storage, pipette deionised water into each of the reservoirs.
- Flush the microchip by placing the syringe into the Reservoir 4 and gently pressing on the syringe, holding the pressure for ten seconds.
- Remove the deionised water from each of the reservoirs using a pipette.
- Remove the reservoir cover and dry the o-rings underneath the cover using a tissue.
- Remove the chip.
Notes
It is sometimes necessary to filter the BGE and sample solutions to prevent particles from blocking the narrow channel of the chip. This can be achieved by using a filter which fits onto the end of the syringe.
It may also be necessary to place the BGE and sample solutions in an ultra-sonic bath to remove any dissolved air in the solutions. Dissolved air can cause the formation of air bubbles in the channel, which can result in an electric arc when the high voltage is applied. This produces high temperatures in the channel which can damage the channel of the chip.
Observing the current flowing through the channel of the chip can be useful when developing a method. This current is displayed in the Sequencer software, and it can be recorded from the monitor connectors at the back of the HVS. If the current reads zero, or is very noisy, during the separation step, this suggests there is an air bubble in channel.
If the channel of the chip becomes blocked with particles, it may be possible to clear the obstruction, either by injecting air into one end of the channel using a syringe, or by using a weak vacuum at one end of the channel. Use a lint-free tissues, as opposed to normal tissues, to prevent particles from blocking the channel of the chip.
If the sample peaks get progressively smaller over successive runs, this may be due to the depletion of ions in the sample reservoir close to the start of the channel. You can mix the sample in the reservoir, by using a pipette to suck the sample in and out of the pipette a few times.
If the baseline begins to drift a lot during the analysis, it may be useful to flush the chip using the syringe. Place the syringe into the outlet reservoir and gently press on the syringe and hold the pressure for ten seconds.
You may have to the alter the Offset and change the Range several times during a series of runs, but do NOT alter the Frequency, Amplitude or Headstage Gain settings until you have completed all the calibration and sample runs in an experiment.
Cleaning and Storing the Chip
The chip can be rinsed and emptied while it is still in the Chip Platform. This is done by pushing the nozzle of a syringe into the sloping reservoir holes of the reservoir cover and gently pushing on the plunger to apply pressure.
Alternatively, this can be done with the chip removed from the Chip Platform, by using a syringe with a rubber O-ring connected to its nozzle. To make this device, cut most of the nozzle from a syringe and glue a rubber O-ring to the end of the syringe. The O-ring is then pushed down onto the glass surface of the chip above the reservoir. The plunger is gently pushed to force liquid or air through the channel of the chip.
For the optimum performance, the chip should be properly treated after use to clean the glass surface and restore the EOF properties. Please follow the instructions provided by the chip manufacturer.
Gated Injection
Introduction
The previous experiment described a Floating Injection, where the reservoirs at the ends of the long separating channel (Reservoirs 2 and 4) are disconnected from the High Voltage Sequencer during the sample injection step. An alternative type of injection, called a Gated Injection, may also be used. A Gated Injection requires two units of the ER230 High Voltage Sequencer, as the voltages at all four reservoirs need to be controlled.
Procedure
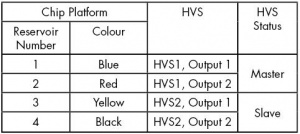
The hardware should be setup as described for the Floating Injection, except the Chip Platform should be connected to the HVS as shown in Table 4.
In the Sequencer software, setup a sequence as shown in Table 5 for cations. For the separation of anions, the polarities of the applied voltages are reverse (set all the voltages in Table 5 to negative values).
In the sequence, make sure that you enter the trigger command for the correct HVS. For example, if you have connected the trigger cable to the Master HVS hardware, make sure you enter the “High/Closed” command in the Digital Out column for the Master HVS.
The sample should be diluted to 100 µM with deionised water. Pipette 50 µL of BGE into Reservoir 4, 3 and 1, and 50 µL of sample into Reservoir 2.
Follow the rest of the instructions to start the PowerChrom and Sequencer softwares.
Flow of Sample and BGE
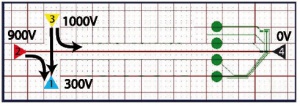
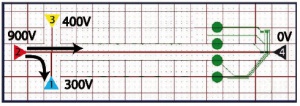
During the initial/separation step (shown in Figure 7) there is a constant flow of sample from Reservoir 2 to Reservoir 1, while the BGE flows from Reservoir 3 to Reservoir 4. There is also flow of BGE from Reservoir 3 to Reservoir 1, which keeps the sample out of the separation channel.
After 45 seconds, the injection step occurs (shown in Figure 8). The voltage at Reservoir 3 is reduced, from 1000V to 4000V, for a fraction of a second. This allows a plug of sample into the separation channel.
When the voltage at Reservoir 3 is restored to its original value, the sample plug is broken off and separated as it flows towards Reservoir 4 and the detector.
Notes for Gated Injections
The amount of sample injected is a function of the length of time of the injection. The formation of the sample plug injected into the separation channel is a combination of electromigration and EOF (if the EOF is in the same direction as the electromigration). This type of injection may produce an electrokinetic bias: faster migrating compounds are introduced into the separation channel in a greater quantity than slower migrating compounds.
Contamination in the chip can reduce the surface charge on the surface of the channel. This explains why the EOF peak may be smaller, or may not be seen at all, when using a chip had been used many times.
