Connecting the C4D to the Agilent 7100 CE
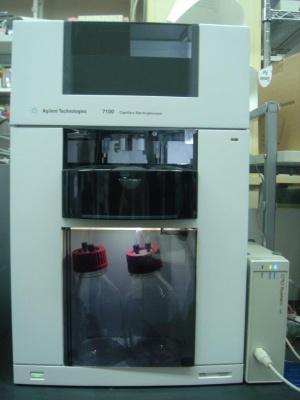
This application note describes how to connect the eDAQ C4D system to the Agilent 7100 CE instrument. See this application note for the Agilent 1600 CE instrument.
Contents
Introduction
The eDAQ C4D can be connected to the Agilent 7100 CE instrument, providing contactless conductivity detection for the instrument. Both the C4D headstage and UV detector can be connected to the capillary at the same time, enabling both types of detection to be performed with a single sample injection.
Equipment Required
- C4D hardware unit, either:
- ER815 C4D Detector to record both C4D and UV signals in ChemStation software,
- ER815R C4D Detector to record only the C4D signal in PowerChrom or ChemStation software, or
- ER825R Two Channel C4D Detector to record both C4D and UV signals in PowerChrom or ChemStation software
- ET120 C4D Headstage for Capillary Electrophoresis
- Agilent 7100 CE instrument with ChemStation software
- Signal cable: EC001-4 BNC to BNC Cables
- Trigger cable: modified version of EC071 Trigger cable with DB9 male (Agilent Remote) to DB9 female (ER815 I2C), available on special order
- EC020 Standard Test Solutions for C4D Applications
Choice of Software
The data from both C4D and UV-Visible detectors can be recorded and displayed in real time. You can use either the eDAQ PowerChrom software or Agilent ChemStation software. Use the ET120 C4D Headstage and select either the:
- ER815 C4D Detector can be configured by the user to use either PowerChrom or third-party software like Agilent ChemStation. The analog output from the ER815 can be connected to the input of the Agilent CE, so the ChemStation software records data from both detectors. The ER815R model includes PowerChrom software to record the C4D signal.
- ER825R Two Channel C4D Detector, can also be configured by the user to use either PowerChrom or third-party software like Agilent ChemStation. The ER825R model includes PowerChrom software and can record the signal from both C4D and UV detectors.
- ER225 C4D Data System can also be used. The analog output of the Agilent UV-Visible detector is connected to the analog input of the ER225. PowerChrom software records the data from both detectors. The ER225 has digital outputs.
Installing the C4D Headstage in the Agilent Cartridge
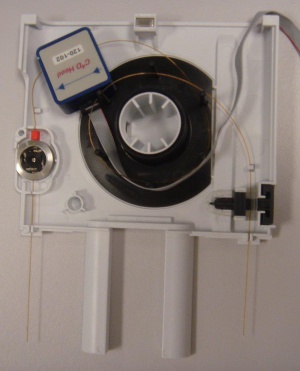
It’s easy to mount the C4D headstage inside the Agilent CE cartridge. Simply thread the capillary through the channel in the side of the C4D headstage and fix in place.
Ensure that you position the C4D headstage near the end of the capillary that is grounded, away from the end of the capillary where the high voltage is applied. This is to ensure that the high voltage doesn’t arc from the background electrolyte inside the capillary, through the thin wall of the capillary, to the headstage and on to the C4D hardware, which could damage the equipment.
You should ensure that the C4D headstage and its flat grey cable are at least 1 cm away from the capillary as it loops inside the cartridge. This is to prevent the high voltage inside the capillary from shorting through the headstage and its cable, which are both electrically grounded.
You should also ensure that the C4D hardware unit is connected to an electrical socket which is grounded.
Installing the ER8x5 Hardware Unit
If you are using the ER815 or ER825 units, you have a choice of recording the data in either PowerChrom software or Agilent ChemStation software.
Using PowerChrom Software
You must have PowerChrom software to do this.
You must also have the Application firmware installed on the C4D hardware unit. The user can switch the firmware themselves, between Serial and Application firmware, using the ER8x5 Converter and Updater Software (download from here and find instructions in the video and manuals).
Set up the hardware and PowerChrom software as detailed in the manuals. Connect the headstage to the capillary. You should connect the modified EC071 Trigger cable, from the CE instrument to the I2C connector at the back of the ER8x5 unit, so that the Agilent ChemStation software sends a message to PowerChrom software to trigger start recording.
Selecting C4D Settings The C4D settings (amplitude, frequency and headstage gain) should be selected in the PowerChrom software. Do not use the C4D Configurator Software when the ER815 and ER825 are configured with applications firmware, or when using the ER225.
Using Agilent ChemStation Software
You must have the Serial firmware installed on the C4D hardware unit. The user can switch the firmware themselves, between Serial and Application firmware, using the ER8x5 Converter and Updater Software (download from here and find instructions in the video and manuals).
You should refer to the Agilent 7100 Capillary Electrophoresis System User Manual, which can be downloaded from here. The Agilent 7100 Capillary Electrophoresis System has a 20-bit AD converter built in. It enables voltage conversions ranging from 0 V to 1 V.
Signal Cable You should connect the analog output from the C4D hardware (“Delta K” BNC connector at the back of the ER8x5 unit) to the analog input of the Agilent 7100 CE instrument, using a BNC to BNC cable.
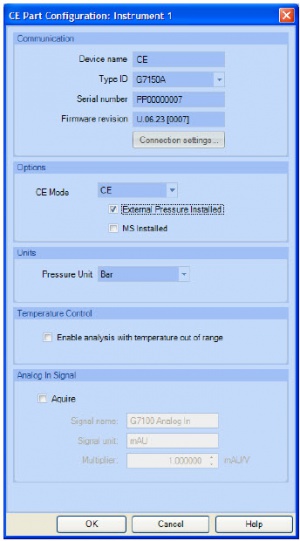
Setting Up ChemStation software Refer to the ChemStation manual. You must tell the software to accept a signal from an external detector. This is done from the dialog window shown in the "CE-part configuration" figure, which is accessible in the software under Instrument/configuration, CE-part configuration. In the "Analog In Signal" tick the "Acquire" box. Give it a name, like "C4D". Change “Signal unit” to V. Set the Multiplier to 1000 (this should mean that the software can record up to 1 V). Then in the eDAQ C4D Configurator software, set the Full Scale Output to 1V. This should mean that both the Agilent analog input and the eDAQ analog output are both set to 1 V.
Selecting C4D Settings The C4D Configurator software allows the setting up of the C4D settings (amplitude, frequency and headstage gain) of ER815 and ER825 C4D Detector when they are configured with the serial firmware. It provides a simple alternative to the use of direct serial commands. Download the C4D Configurator software from the Software Downloads. The procedure for using this software is shown in a video and has been written up as a pdf manual.
Procedure for connecting the ER8x5 to the Agilent 7100 and using Agilent ChemStation to record the data
- Install C4D Configurator software and C4D Profiler software to computer
- Connect ER815 C4D Detector to power and use USB to computer
- Connect headstage to C4D unit; make sure the power on the C4D unit is off!
- Use BNC to BNC cable. Connect it to the delta K connector at the back of the ER815. Connect the other end to the analog input on the right side (towards the back) of the Agilent 7100 instrument.
- Turn on C4D unit; On the computer, the operating system should install the driver
- Open C4D Configurator software
- Select 1000 kHz and click apply to all
- Select amplitude 80% and click apply
- Click green arrow and see the signal move in the window
- Push a piece of capillary into the headstage. Manually inject water or background electrolyte into the capillary to confirm you can see a change in signal in the C4D Configurator software.
- Turn on Agilent 7100 instrument and its software
- In ChemStation software, in the menu Instrument, Instrument Configuration, under Select Modules, double click CE (product number) to open the CE Part Configuration Instrument 1,
- Under analog input Signal, Click the Aquire check box, Signal name = C4D, signal unit = V, multiplier = 1000
- You may need to restart ChemStation software
- In menu View, click Online Signals, Signal Window 1 to open Online Plot window, click Change, on the left find the CE1A, G7100 Analog in (V) signal and click add so it moves to the right side "Selected Signals", click ok, you should see the C4D signal in the window
- Manually inject water or background electrolyte into the capillary to confirm you can see a change in signal in Agilent ChemStation software
- Put headstage on capillary
- Put cartridge in instrument
- When you have confirmed that ChemStation software is recording the C4D signal, you are ready to inject background electrolyte into the capillary, use the C4D Profiler software to work out optimum C4D settings (amplitude, frequency and headstage gain), and then use the C4D Configurator software to select those C4D settings
Citations
- The eDAQ C4D was used with the Agilent CE for the analysis inorganic ions in drinking water. DOI: 10.1080/10826076.2013.825862
- The C4D detected both anions and cations in a single injection. This was done by injecting the sample at both ends of the capillary and placing the C4D headstage at an appropriate position along the capillary.
- It was noted that C4D detection is an alternative and more flexible method of detection compared to the standard optical detection. The effective separation length can easily be adjusted by simply sliding the C4D headstage along the capillary, significantly facilitating the method development and the obtained separation efficiency.
- The estimated limits of detection (0.07 – 2 ppm) and defined limits of quantification (0.3 – 7 ppm) were comparable or better than those described for indirect UV detection, allowing much broader linear ranges (up to 120 ppm) for most of the studied ions.
- The Agilent CE was coupled with the eDAQ C4D for the simultaneous determination of atenolol and amiloride in pharmaceutical preparations. Good analytical performance with regards to linearity, reproducibility, and accuracy was achieved using the CE-C4D method. DOI: 10.1002/bmc.1390
- The determination of cis/trans isomers ofoctadec-9-enoic acid and other long chain fatty acids was performed using the Agilent CE with eDAQ C4D. The method was applied to the determination of fatty acids in margarine samples. The proposed method offers distinct advantages over the GC and HPLC methods, especially in terms of simplicity (without derivatization) and sensitivity. DOI: 10.1016/j.chroma.2013.03.014


