Troubleshooting Issues with the Potentiostat
From eDAQ Wiki
Contents
Confirming the Potentiostat Turns On and Communicates with the Software Properly
- Connect the power cable, USB cable and electrode cable to the potentiostat. If you are using a modular potentiostat and e-corder, connect them together as explained in the potentiostat manual.
- Turn the potentiostat on and observe the LED lights on the font of the potentiostat (if you are using a modular potentiostat and e-corder, look at the lights at the front of the e-corder)
- After a few seconds, you should see a blue and green LEDs lit, and also the O’load (overload) lit. If you see this, the potentiostat is turning on properly. See the potentiostat or e-corder manual to learn more about the LED lights.
- If you see a red LED, this indicates a problem. Try to turn the potentiostat off, wait a few seconds, then turn back on again, to see if you can see the correct LED lights. If you still see red LEDs lit, make a note of the sequence of 5 short or long flashes (for example: long, long, short, short, long) and then email the sequence to the eDAQ engineer.
- Launch EChem software on the computer and observe the LED lights. You should see the blue and green LEDs lit, with the green LED occasionally flashing orange/yellow. The O’load LED should have turned off. If you see this, the EChem software is communicating with the potentiostat properly.
If both the potentiostat and software have started properly, the next step is to test if the potentiostat is working properly. This is done using the Potentiostat Maintenance Check, where a known voltage is applied across a known resistor, and the measured current is compared against the theoretical current, using Ohm’s Law: current = voltage divided by the resistance.
Potentiostat Maintenance Check with a Resistor
- Find a one megaohm resistor (from any good electrical shop).
- Connect the potentiostat’s electrode cable to the resistor, with the green clip (working) on one side of the resistor, and both the yellow clip (reference) and red clip (counter, or auxiliary) on the other side of the resistor.
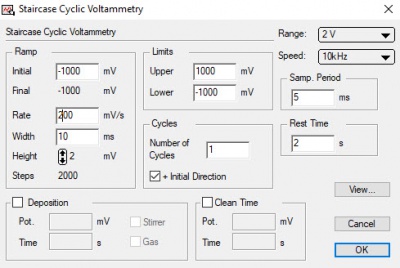
- In the EChem software, go to the menu Technique, and select Cyclic Voltammetry. See Fig 1.
- In Limits, set Upper to 1000 mV and Lower to -1000 mV.
- In Ramp, set Initial to -1000 mV, set Rate to 200 mV/s, set Width to 10 mS, set Height to 2 mV.
- Set Number of Cycles to 1, set Samp. Period to 5 ms, set Rest Time to 2 s.
- Deposition and Clean Time should not be clicked.
- Click ok.
- Set the current Range, on the right side of the screen (under i Channel) to 20 µA.
- Click Start in the bottom right of the screen.
- You should see a diagonal line, starting at -1 V and -1 µA, going to +1 V and +1 µA.
- When the scan is finished and it asks to save the file, type in the name “Potentiostat Maintenance Check”.
- Click the small page comment symbol, in the bottom left of the screen, and in the page comment window, type “one megaohm resistor”.
Potentiostat Maintenance Check with the Dummy Cell
- Click “Potentiostat”, under the current Range, to open the potentiostat window.
- In Cell, click Dummy (to select the dummy cell)
- Click ok.
- Click Dummy Cell in the bottom right of the screen to start the run.
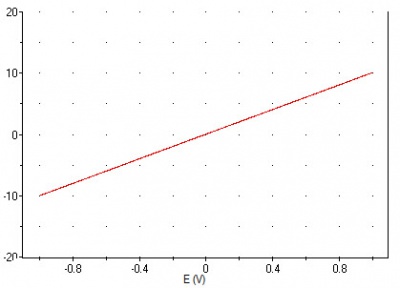
- Depending on which eDAQ potentiostat you have (as they have different resistance values for their dummy cell), you should see either:
- A diagonal line, starting at -1 V and -1 µA, going to +1 V and +1 µA, or
- A diagonal line, starting at -1 V and -10 µA, going to +1 V and +10 µA (see Fig 2).
- Click the small page comment symbol, in the bottom left of the screen, and in the page comment window, type “dummy cell”.
Save the file with both runs, one using the resistor and one using the dummy cell, close EChem software and attach the EChem data file to an email and send it to your eDAQ engineer. We need to be able to see the data file rather than just a screen capture of the data.
Please send me an email:
- Explain which LED lights are lit on the front of the potentiostat (or e-corder if using a modular potentiostat) when the EChem software is on.
- If red LED lights are flashing, tell me sequence of 5 short or long flashes (for example: long, long, short, short, long).
- Do the two cyclic voltammetry runs, one using a one megaohm resistor and one using the potentiostat’s dummy cell.
- Use the Page comment function in the software to indicate which run is the one megaohm resistor and which is the dummy cell.
- Attach the EChem software data file to an email and send it to me. I need to be able to see the data file rather than a screen capture of the data.

