トラブルシューティング I ー コンピュータがハードウェアを認識しない
はじめに
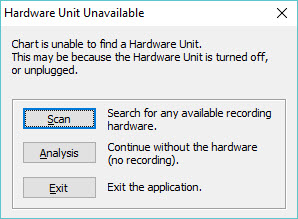
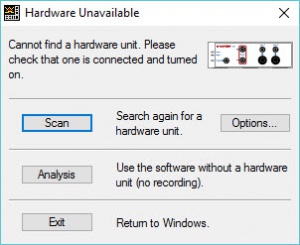
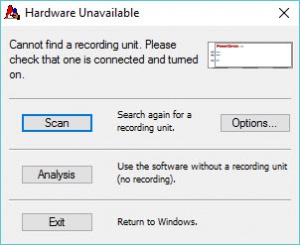
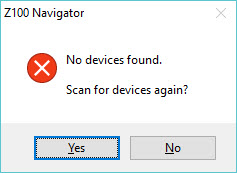
eDAQソフトウェアを立ち上げると、まづソフトウェアはeDAQハードウェアがコンピュータに接続され電源が入っていることを確認し、交信を開始します。この時、ソフトウェアがeDAQハードウェアと交信できないと、次のようなメッセージが表示します:
- Hardware Unavailable, Chart is unable to find a hardware unit:ハードウェア利用不可。Chartがハードウェアを確認できません。(Charソフトウェア)
- Hardware Unavailable, Cannot find a hardware unit:ハードウェア利用不可。ハードウェアの確認ができません。 (EChem及びScopeソフトウェア)
- Hardware Unavailable, Cannot find a recording unit:ハードウェア利用不可。レコーディングユニットの確認ができません。 (PowerChromソフトウェア)
- Z100 Navigator, No device found:Z100ナビゲータはデバイスの確認ができません。(Z100 ナビゲータソフトウェア)
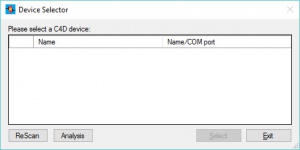
- Device Selector, Please select a C4D device:デバイスセレクター、C4Dデバイスを選択してください。(C4D Profiler V2ソフトウェア)
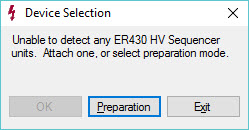
- Device Selection, Unable to detect any ER430 HV Sequencer units.:デバイスセレクターがER430 HVシーケンサーが確認できません。(QuadSequencerソフトウェア)
Analysis Mode
Analysis Mode(解析モード)になっている時は、最後に保存したデータを表示します。この場合は、表示しているデータを解析し保存できます。但し、ハードウェアとの交信ができないので新たなデータも記録できません。
データを記録するには、使用するソフトウェアとハードウェアとの交信が必要です。
Note: To always run in Analysis mode. You may want to install the eDAQ software on a computer that will never be used to run experiments on. Maybe it’s a computer outside the lab, in your office or a personal laptop, on which you only want to view and analyse the data you collected in the lab. You can set the software so that, each time it’s launched, it won't check to see if eDAQ hardware is connected to the computer. You can set this by:
- In Chart software, go to the menu Edit, select Preferences, Hardware Unit Startup, and click Always start in analysis mode
- In PowerChrom software, go to the menu Edit, select Preferences, Hardware-Startup and click Always start in analysis mode
Check List
Perform the checks listed below. DON’T MISS ANY STEPS until your problem is solved!
- Check the hardware unit is turned on! Make sure that the LEDs on the front of the hardware unit are lit. If you see red LEDs flashing on the front of the hardware unit, turn the hardware unit off and on to see if that clears the problem. If the red LEDs are still there, there is something wrong with the unit; please contact eDAQ.
- The USB cable:
- Make sure the USB cable is connected to the computer and to the hardware.
- Try a different USB cable. USB cables can break or become intermittent, so it’s a good idea to try a different one. eDAQ equipment uses either the standard USB cable used by other electronic devices like printers, or the mini USB cable, so you should be able to borrow a cable from a different device.
- Connect the eDAQ hardware to a different USB connector on the computer. The computer might have a faulty USB port. USB ports on the front of a desktop PC can be a bit more troublesome, due to the extension leads used to connect them to the motherboard; try connecting to the back of the computer. Windows can also get confused, and refuse to have that device on a particular USB port (at least until the next reboot).
- If you are using a USB hub, try connecting the eDAQ hardware directly to the USB connector on the computer. The USB hub might be interrupting the communication.
- Reinstall the eDAQ software, to ensure the latest version of the driver is installed. Don’t rely on using the software that came with the equipment. Older software versions won't be able to work with new hardware. Make sure you are installing the latest version of the software downloaded from the software download webpage.
- turn the hardware off
- reinstalling the eDAQ software for that device
- turn the hardware on
- it may take Windows a 2-3 minutes to find and install the driver correctly.
- Try a different computer. A virus on a computer, or a particular setting on a computer, can stop the communication to the eDAQ hardware. Try installing the eDAQ software on a different computer and connecting the eDAQ hardware to that computer, to see if the same problem occurs.
- Make sure that Windows is using the correct driver for eDAQ hardware. Do this by:
- Press the Windows key on your keyboard (or click the Start button) and type Device Manager.
- In the Device Manager window, find your eDAQ hardware; it might be under the headings “eDAQ e-corders” or “Ports (COM & LPT)”. If there is a problem, it may show under Universal Serial Bus controllers or other devices.
- Hover the mouse pointer over the eDAQ hardware and right click the mouse; select “Properties”. A window will open and will give you information in the "Device status" section.
- If the issue is that the driver is missing (it will have a yellow triangle on the icon in Device Manager):
- Let Windows try to find the driver (will only work after installing the eDAQ software for the device):
- right-click on the device
- choose "Update driver"
- select the "Search automatically" option
- Wait 2-3 minutes for Windows to find and install the driver
- If that doesn't work, manually install the driver:
- First get the standalone copy of the driver files. These can be found on the eDAQ software install USB sticks, and in the "Utilities and Tools" section of the eDAQ website.
- If the download is an "exe" file, then:
- Turn off your device
- Run the "exe", to install the drivers
- Turn the device on, and wait 2-3 minutes for Windows to install and configure it.
- If the download is a ZIP file with an "inf" file in it:
- Extract the ZIP file's contents
- Right-click on the device in device manager
- choose "Update driver"
- Select the "Browse my computer for driver software" option
- Browse to the extracted files, select the folder/INF file
- It may take Windows a 2-3 minutes to then install the driver
- If none of the above suggestions solve your problem, please could you fill in with as MANY DETAILS as possible, the Technical Help Request form. Let us know what you tried from the instructions on this page, and what did/didn't happen.
